

A successful interior designer collaboration for window treatments connects consultation, measurement, design selection, ordering, and installation. The designer and window-treatment specialist align each decision with the room’s proportions, finishes, light-control needs, and privacy requirements. This gives the window a considered role in the overall design rather than leaving it as a finishing detail.
Window treatments shape a room’s look and everyday comfort, so timing and clear communication matter. This guide explains how designers and architects can coordinate each stage, from discussing the brief and assessing the windows to selecting drapes, shades, or blinds and planning installation. It also considers how layered treatments and motorization can support light control and privacy while preserving the room’s character. A shared process helps bring practical requirements and aesthetic choices together.
Key Takeaways
- Align consultation, showroom selections, ordering, and installation with the project schedule to keep window treatments integrated with the wider design.
- Coordinate measuring and design decisions around each window’s dimensions, room function, materials, and finish palette.
- Clarify roles and project handoffs so designers and architects can work smoothly with a window-treatment partner from selection through installation.
- Choose and layer treatments according to each room’s daylight and privacy needs, balancing practical control with a cohesive look.
Consultation, showroom visits, ordering, and installation
A clear workflow links the design brief to product selection, ordering, and installation. At each stage, the designer and client can resolve practical details before they affect the finished room.
Client Consultation and Project Support
Use the consultation to compare how drapes, blinds, shades, and shutters suit each room’s function, design, and budget. Drapes add fabric and softness; blinds offer adjustable slats; shades create a streamlined profile; shutters bring a structured architectural look. Consider bedroom privacy, living-room light, and window shape when choosing.
Project support should clarify selection steps, sample reviews, ordering responsibilities, and installation timing. For example, reviewing a fabric beside the room’s flooring and paint helps the client assess color and texture in context. The median annual wage for interior designers was $67,190 in May 2025, according to the U.S. Bureau of Labor Statistics.
Information for Treatment Selection
Before choosing treatments, share room measurements or plans, window locations, ceiling height, furnishings, finish selections, and the project schedule. Explain how each room is used, where privacy matters, and whether the priority is filtered daylight, darkness, or a layered effect. Photos can help show nearby materials and architectural details.
Also identify the desired operating style, preferred fabric or material, and any motorization goals. These details help narrow options and coordinate treatments with the design scheme. Price depends on the project and is provided after a quote request; dimensions, materials, operating systems, and installation scope affect it.
At a showroom visit, compare samples in person and consider their color, texture, and opacity together. Bring finish references or a mood board, then record the selected material, dimensions, and operating details in the project schedule. A sample that looks beautiful on its own may read differently beside the room’s wood, stone, or upholstery.
Before ordering, confirm the final selections and document who handles each approval and handoff. Accurate measurements connect the specification to the window, while a shared schedule helps align delivery and installation with other project work. During the install, review placement and operation against the approved design so the finished treatments feel intentional in the space.
Project coordination, measuring, design, and installation
A dependable project sequence connects accurate measurements to the room’s design and finished installation. Clear ownership of approvals, specifications, and site preparation helps keep each handoff precise.
Measuring and Selecting Custom Treatments
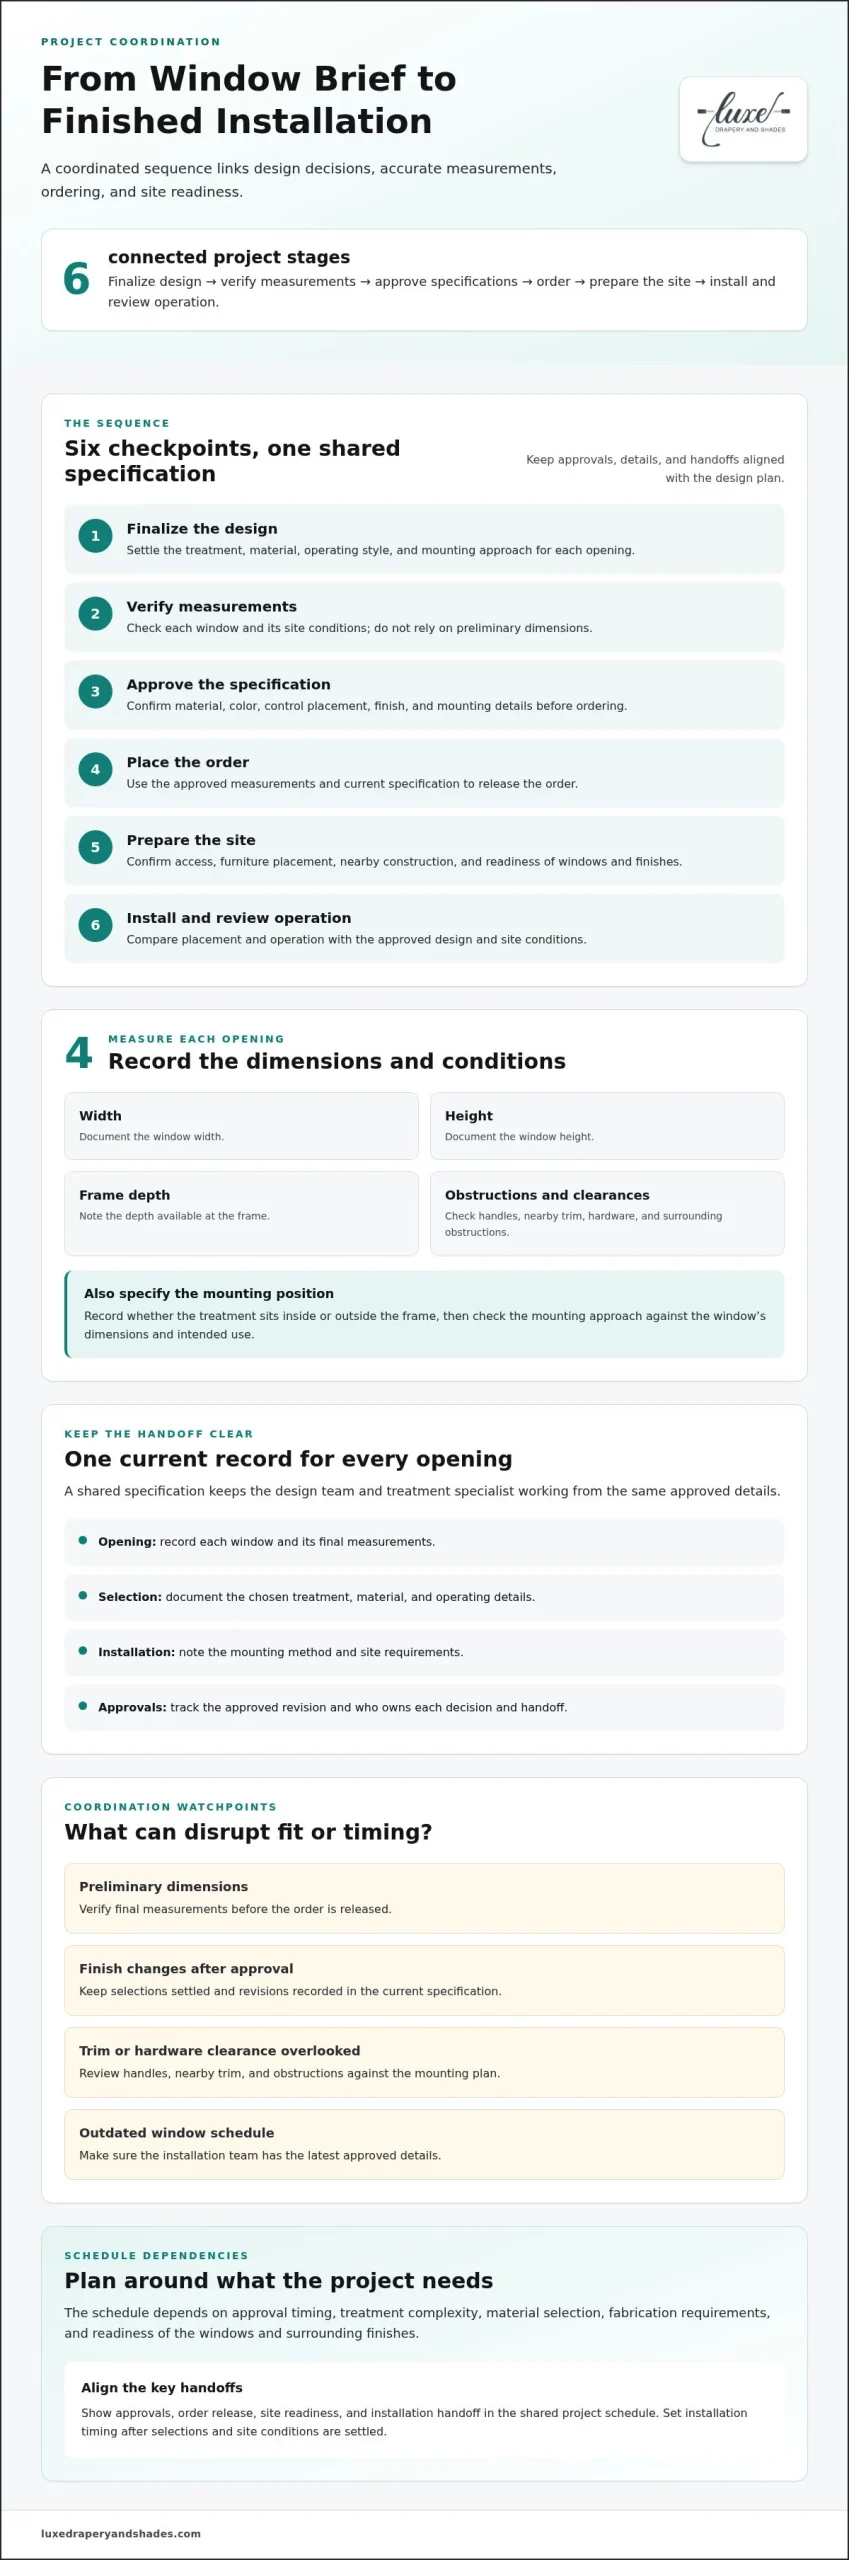
Record each window’s width, height, frame depth, and surrounding obstructions. Note handle positions, nearby trim, and whether the treatment will sit inside or outside the frame. Then compare the selected material, operating style, and mounting approach with the window’s dimensions and intended use.
Once measurements are documented, review the specification against the design plan. Confirm the fabric or shade material, color, control placement, and finish before ordering. This sequence helps align drapes or shades with the room’s proportions and avoid conflicts with hardware or nearby furnishings.
Coordination Risks and Mistakes
Common coordination problems include relying on preliminary dimensions, changing finishes after approval, and overlooking trim or hardware clearance. A late change to the window schedule can also leave the installation team working from outdated details. Keep one current specification that records each opening, selected treatment, mounting method, and approved revision.
Before installation, compare the order details with the final measurements and site conditions. Confirm access, furniture placement, and completion of nearby construction. These checks help ensure the treatment fits, clears obstructions, and aligns with the intended design.
Design, Fabrication, and Installation Timeline
The process follows a practical sequence: finalize the design, verify measurements, approve specifications, place the order, prepare the site, then install and review operation. The schedule depends on approval timing, treatment complexity, material selection, fabrication requirements, and readiness of the windows and surrounding finishes.
Build these dependencies into the project schedule instead of setting an installation date before selections are settled. A pending finish decision, for example, can delay ordering, while unfinished trim can affect installation. A shared schedule should show approvals, order release, site readiness, and the installation handoff.
For a smoother handoff, keep project specifications and installation needs aligned with your design plan. Explore window-treatment project coordination as a reference for planning those details.
Turnkey window-treatment partnerships for interior designers and architects
A turnkey partnership gives designers and architects a clear framework for integrating window treatments into project delivery. Defined responsibilities, documented selections, and coordinated approvals help each treatment support the finished interior.
Designer Partnership Process
Set the process at project kickoff: identify the design lead, decision-maker, approval steps, and installation handoff. A partnership framework can also clarify how specifications, revisions, ordering, and site coordination move between the design team and treatment specialist.
For trade pricing and discounts, distinguish commercial terms from design decisions. Request a project-specific quote that explains the scope and relevant factors, such as treatment type, materials, operating system, and installation requirements. This makes cost review part of the approval workflow without letting an assumed discount shape the design.
Finding a Window Treatment Specialist
When choosing a specialist in Los Angeles, look for examples of window treatments integrated with complete interiors, not just isolated product images. Useful signs of expertise include clear measurement and specification practices, familiarity with varied window shapes, and coordination between design selections and installation.
Consider how the specialist discusses fabric, light, privacy, and operating preferences alongside the room’s architecture. For example, the design team may need blinds that complement the trim while preserving sightlines. The right partner offers technical input that supports the overall design without displacing the designer’s vision.
For a turnkey arrangement, define the project scope, communication channel, approval points, and responsibility for each handoff. Architects can share window schedules and construction details; designers can align materials and finishes with the interior palette. On comprehensive commercial or residential fit-outs, such as those executed by Fintouch Decor, aligning these inputs early makes treatment specifications seamless to coordinate with other trades.
A partnership program is most useful when it creates a repeatable workflow across projects. Document how revisions are recorded, who approves final selections, and how installation requirements reach the site team. This structure supports consistency while letting each room’s design and function guide its treatment.
Designers developing a coordinated specification can explore window-treatment design guidance as they shape their project workflow.
Natural light control and privacy
Window treatments shape daylight, privacy, and a room’s sense of comfort. Start by identifying what each window needs to do at different times of day.
For a bedroom where daytime darkness matters, layer a blackout roller shade with sheer panels and use a pelmet to reduce light gaps. In a living room, sheer fabric can soften direct daylight and maintain a brighter atmosphere. These contrasting examples show why treatments should suit each room’s use rather than follow one style throughout the home.
Prioritize privacy by considering the window’s position, sightlines, and daily routines. A street-facing room may need coverage while still welcoming daylight; in a bathroom, privacy is a central design requirement. Select the treatment’s opacity and operating position around those needs, then coordinate its color and texture with the overall palette. For openings where drapes or shades alone cannot resolve intense glare or privacy demands, incorporating window film options from specialists like Sunnyside Glass Solutions can complement the broader design scheme.
Layering can combine adjustable light control with a considered finish, but too many elements may crowd the window. Pair a functional shade with drapery when the room benefits from both privacy and softness. Floor-length drapery creates a more complete vertical line than panels ending at the sill, while thoughtful mounting keeps the composition from feeling cluttered.
For architects and designers, window treatments can also support sustainable design by reducing reliance on artificial lighting and helping regulate indoor temperature. In commercial spaces, consider how changing daylight affects the work area and visual comfort. Select styles that respond to those practical demands while complementing the architecture. Explore light-control and privacy options to shape a considered window-treatment plan.
Luxe Drapery and Shades: Custom Drapery
Luxe Drapery and Shades can help when a project calls for Custom Drapery tailored to the room’s design and practical needs. Designers can also consider Roller Shades, Roman Shades, and Honeycomb / Cellular Shades for light control, privacy, and a tailored finish. Each option brings a distinct balance of texture, structure, and function to the window.
Bring the room’s palette, window details, and priorities into the conversation to guide a cohesive selection. In a layered scheme, custom drapery can complement a shade while adding softness and dimension. Explore the options with Luxe Drapery and Shades, and contact the team to discuss your project.
Shape the Next Design Decision
A considered window treatment can do more than complete a room. It can frame the view, soften the architecture, and help the space feel thoughtfully composed throughout the day. Treat the window as an integral part of the interior, not merely a finishing detail.
A thoughtful interior designer collaboration for window treatments starts with a shared vision for how each space should look and feel. Luxe Drapery and Shades offers Custom Drapery, Roller Shades, and Roman Shades, giving designers distinct options to consider. Fabric, texture, and the way a treatment sits within the room all help shape its atmosphere.
When you’re ready to explore a window-treatment direction for your project, contact Luxe Drapery and Shades. Bring your design goals and preferred aesthetic to the conversation, and take the next step toward a more harmonious living space.
Frequently Asked Questions
How do interior designers collaborate with clients on window treatments?
An interior designer collaboration for window treatments works best when the client shares how each room should look and feel. In Los Angeles, for example, a client may want a consistent palette across open-plan spaces while creating more privacy in a bedroom. Discussing preferred textures, views, and daily routines helps the designer shape selections that feel personal and connected to the home.
What window treatment fabrics and styles work best for privacy, light control, and energy efficiency?
In an interior designer collaboration for window treatments, select fabrics and styles according to each room’s privacy needs, daylight, and visual character. A sheer treatment can soften incoming light, while a more substantial fabric supports a layered, private feel. Cellular shades, Roman shades, and drapery offer distinct design directions. Treatments can also help regulate indoor temperature, making comfort part of the selection discussion.
Who is responsible for measuring and ordering window treatments: the designer, client, or installer?
Assign responsibilities clearly in the project scope before selections move forward. The designer can coordinate specifications and client approvals, while the project scope should identify who handles measurements and ordering. Luxe Drapery and Shades’ process includes accurate measurements, product ordering, and scheduled installation. For a Los Angeles project, defining that sequence helps prevent assumptions about each handoff.