

What if adding a handheld control to your window treatments didn’t risk resetting your entire smart home ecosystem? Introducing a sleek Pico remote should elevate your daily convenience, yet learning how to pair a new remote to Lutron shades often brings unexpected friction. It’s completely natural to worry that a mistaken button press might wipe out your established upper and lower window limits, leaving your motorized shades unresponsive against an architectural valance.
You deserve seamless, quiet operation, not the frustration of locating discreet shade indicator buttons or guessing whether your home relies on direct RF signals or a Lutron Smart Hub. Fortunately, connecting a new remote is straightforward once you know whether standalone or system-bridge pairing applies to your room. In this guide, you will master the simple steps to sync your new remote, preserve your shade’s precise travel positions, and restore refined control to your living space.
Key Takeaways
- Distinguish between standalone installations and processor-connected setups to avoid accidental resets of your smart system.
- Discover how to pair a new remote to Lutron shades directly using a swift radio-frequency handshake while safeguarding established open and close limits.
- Learn why hub-managed systems require programming via the Lutron app to enable seamless multi-shade synchronization and tailored scenes.
- Personalize your Pico controls with custom mid-point favorite heights and resolve common signal interference caused by architectural pocket mounts.
Identifying Your Lutron Shading System and Remote Control Hardware
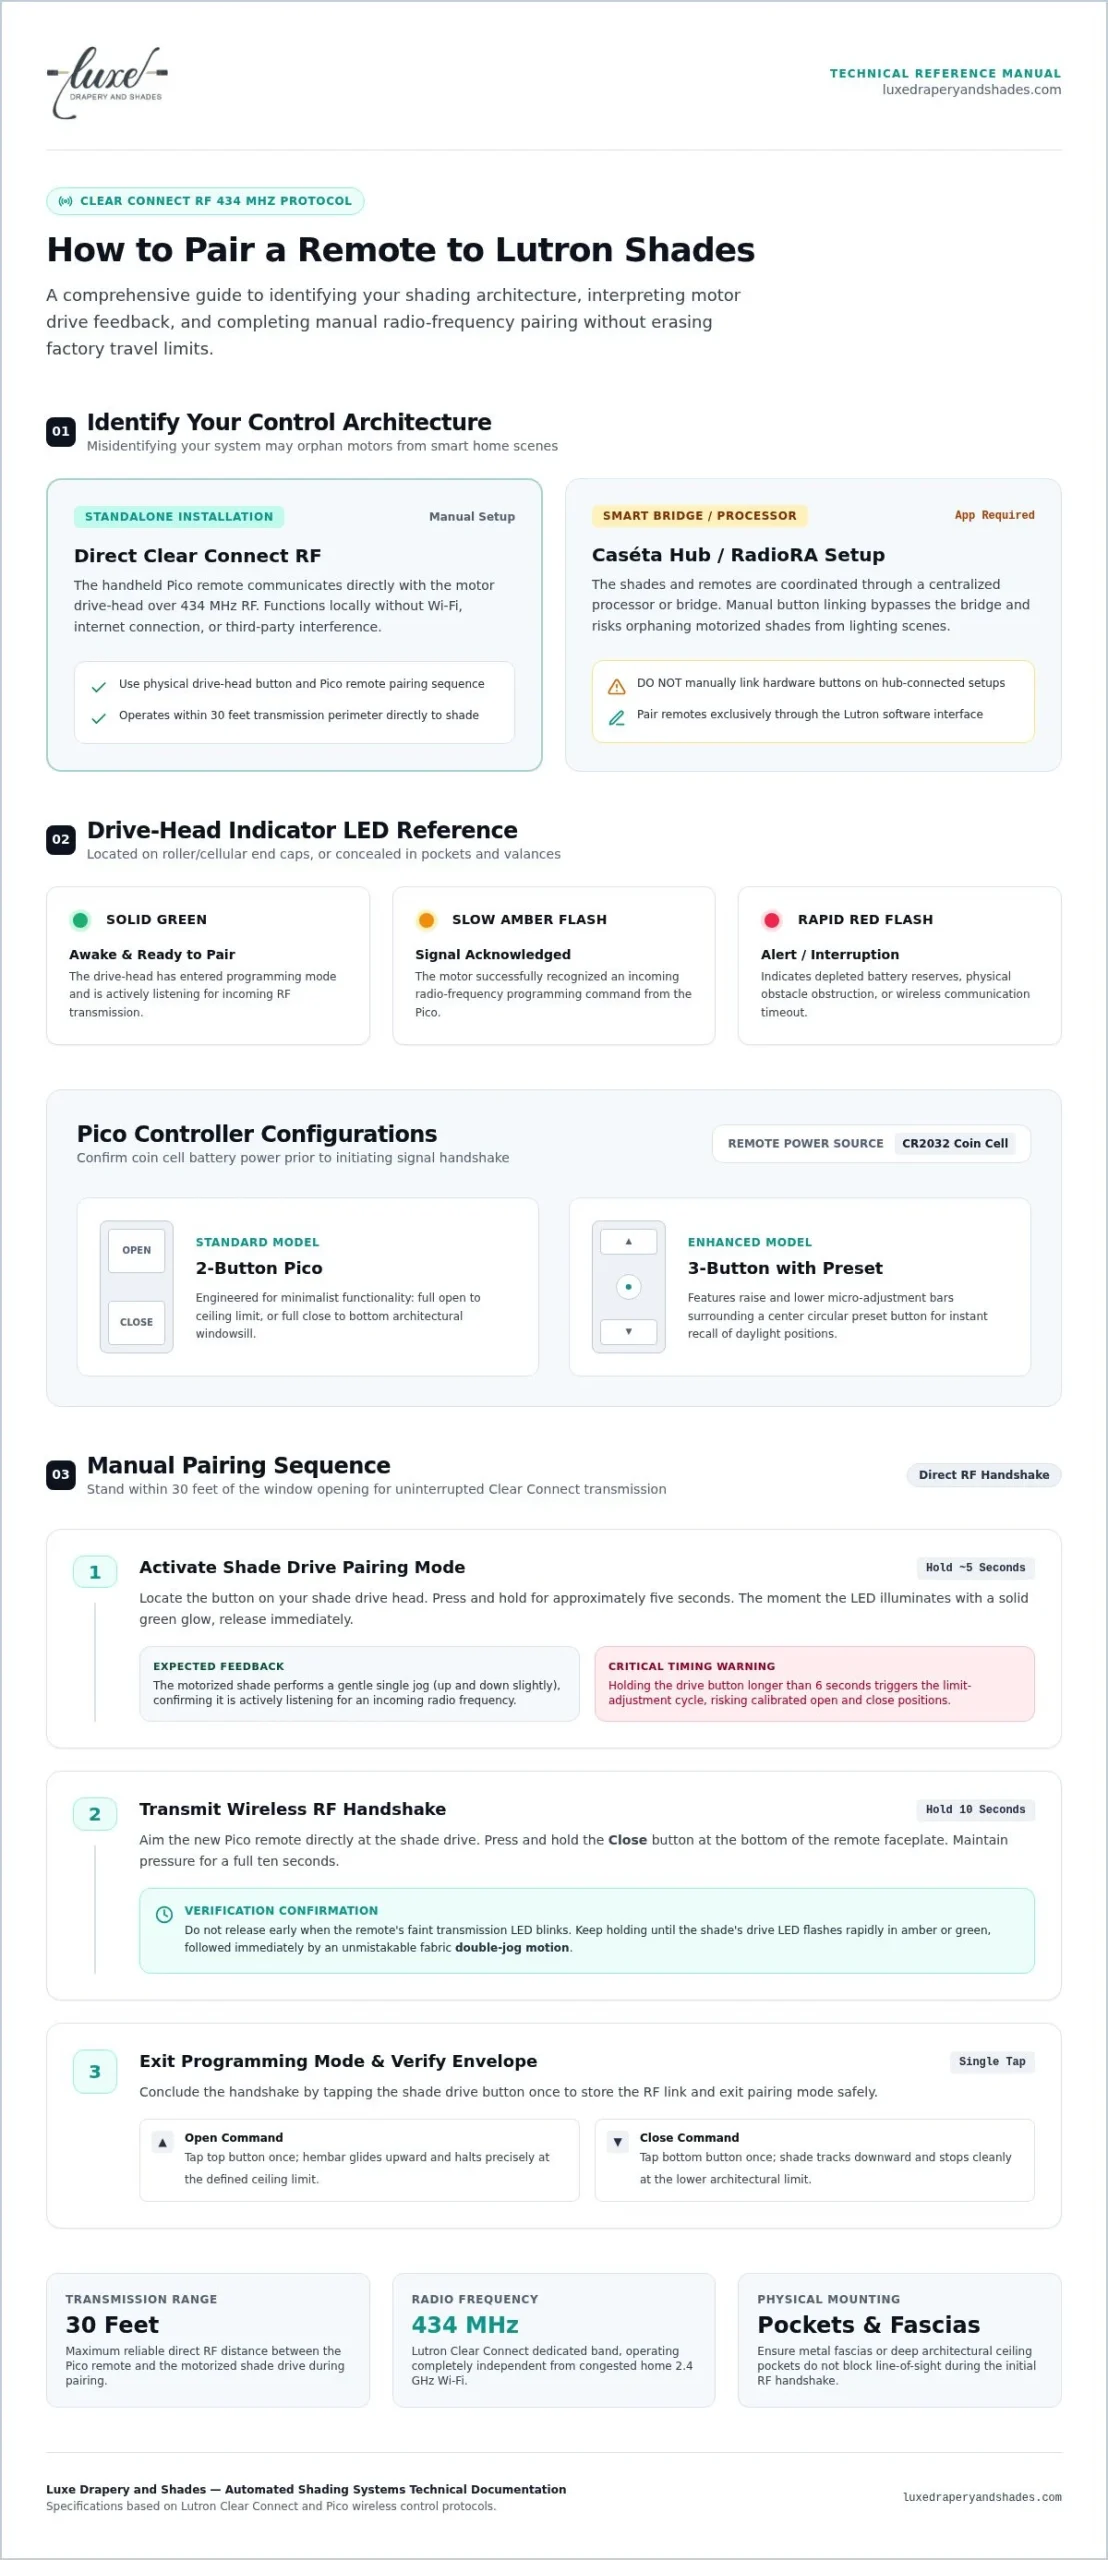
Before pressing buttons at random, pause to examine your hardware. Misidentifying your system often leads to accidental factory resets, wiping out calibrated shade limits. Rooted in the precision engineering heritage established by Lutron’s founder, Joel Spira, these systems blend whisper-quiet luxury with sophisticated signal protocols. Recognizing your specific configuration is the vital first step in learning how to pair a new remote to Lutron shades without interrupting your home’s daily comfort.
Locating the Shade Indicator LED and Button
Every motorized shade features an integrated programming button alongside a multi-color LED. On battery-operated roller shades and cellular honeycombs, this button sits subtly on the drive-head end cap. For sophisticated architectural installations, such as recessed Sivoia QS assemblies or custom motorized drapery tracks, controls often hide discreetly beneath tailored fabric valances, matching metal fascias, or ceiling pockets.
Watch the LED for immediate feedback:
- Solid Green: The shade drive is awake and ready for pairing.
- Slow Amber Flash: The motor successfully received a programming signal.
- Rapid Red Flash: Indicates low battery reserves, an active obstacle, or a communication timeout.
Pico Remote Models and Control Layouts
Lutron’s Pico wireless controllers share a sleek profile but differ in button utility. Standard two-button models deliver minimalist open and close functionality. The popular three-button design introduces raise and lower bars surrounding a circular preset button, allowing you to recall a customized daylight position instantly. Before pairing, verify that the remote’s CR2032 coin cell battery has sufficient power. A depleted coin cell can mimic a signal failure, stalling the handshake.
Direct RF Connection vs. Lutron Bridge Integration
The control architecture of your residence determines your setup path. Standalone shades communicate directly with Pico remotes across Lutron’s Clear Connect 434 MHz wireless radio frequency. This connection functions locally without Wi-Fi or third-party interference.
If your residence incorporates a Caséta Smart Hub or RadioRA processor, manual motor pairing must be avoided. Direct button linking bypasses the processor and can orphan the motor from room scenes. When determining how to pair a new remote to Lutron shades integrated into a broader lighting ecosystem, configuration should always flow through the Lutron software interface rather than physical hardware taps.
Pair a New Remote to Lutron Shades via Direct Manual Setup
For standalone installations without a smart hub, programming creates an immediate wireless handshake between the handheld controller and the internal drive. Stand within thirty feet of the window opening to guarantee an uninterrupted Clear Connect transmission. As highlighted in CNET’s Best Smart Blinds review, the precision and whisper-quiet responsiveness of Lutron motors lead the industry, but timing is everything during setup. Following the exact sequence below ensures you master how to pair a new remote to Lutron shades without accidentally altering factory travel limits.
Step 1: Put the Motorized Shade into Pairing Mode
Locate the indicator button on your shade’s drive head. Press and hold this button for approximately five seconds. The moment the LED illuminates with a solid green glow, release your finger immediately. Holding the button for longer than six seconds risks triggering the limit-adjustment cycle instead. A successful entry into pairing mode produces a gentle physical response: the motorized shade jogs up and down slightly, confirming the motor is actively listening for an incoming radio frequency.
Step 2: Send the Wireless Signal from the Pico Remote
Aim your new Pico remote directly toward the window opening. Press and hold the Close button, located at the bottom of the remote faceplate. Maintain steady pressure for a full ten seconds. Do not release early when the remote’s faint transmission light blinks. Keep holding until the shade’s indicator LED flashes rapidly in amber or green. Immediately following this rapid flash, the fabric will perform an unmistakable double-jog motion, verifying bidirectional signal reception between the remote and the internal drive.
Step 3: Exit Programming Mode and Test Operation
Conclude the handshake by tapping the shade button once to store the link and exit pairing mode safely. Now, test the travel envelope using your new Pico:
- Open Command: Tap the top button once; the hembar should glide smoothly upward and halt precisely at your defined ceiling limit.
- Close Command: Tap the bottom button; the fabric should lower cleanly, resting flush against the window sill.
Learning how to pair a new remote to Lutron shades is remarkably simple for accessible windows. However, if you are balancing on ladders to reach soaring clerestory heights or hidden ceiling pockets, partnering with the motorization specialists at Luxe Drapery and Shades will ensure every shade is safely paired and exquisitely balanced.
Pairing a Remote Using the Lutron App and Smart Processors
When your residence features a connected system, manual hardware tapping gives way to digital configuration. Attempting a direct motor pairing when your window treatments already communicate with a processor creates signal confusion. The motor drops off its smart bridge, breaking scheduled automations and voice control. Instead, software enrollment preserves your ecosystem while unlocking unified multi-shade synchronization. Exploring Lutron home automation in Los Angeles demonstrates how effortlessly motorized window treatments harmonize with architectural lighting once configured through a central processor.
Adding the New Pico Remote Inside the Lutron App
Make sure your smartphone connects to the same Wi-Fi network hosting your smart hub. Launch the Lutron App, navigate to Settings, and tap Add Device. From the curated menu of accessories, select Pico Remote, choosing the icon that mirrors your controller’s faceplate design.
The app will prompt you to send an identifying transmission. Press and hold the bottom button on your Pico remote for ten seconds. The bridge flashes in acknowledgment, confirming the new controller has joined your local network without touching a single window treatment drive head.
Assigning Shades and Rooms to Your New Remote
Once recognized, the app invites you to designate which fixtures respond to the remote. You can bind a single Pico to one specific roller shade, or assign it to command an expansive living pavilion with multiple window coverings. Check the boxes corresponding to each treatment you wish to control. You can pair motorized roller shades alongside customized drapery tracks so they glide in flawless unison with a single tap.
System Considerations for RadioRA 3 and HomeWorks
Architectural residences powered by RadioRA 3 or HomeWorks handle device enrollment through specialized Lutron Designer software. In these environments, wireless controls transmit through Clear Connect processors engineered for expansive square footage. Lutron’s active role within the Connectivity Standards Alliance reflects its commitment to robust, standards-based smart architecture that ensures seamless device interoperability across broad home networks.
Understanding how to pair a new remote to Lutron shades in luxury estates requires precision. When integrating specialized treatments like Lutron Sivoia motorized shades across multi-story estates, partnering with a certified motorization specialist protects your system architecture while delivering flawless, room-spanning light control.
Customizing Pico Functions: Group Control, Favorites, and Limit Adjustments
Pairing your remote is simply the starting point. Tailoring your Pico controller transforms standard motorized shades into an intuitive element of your interior architecture. Whether orchestrating multiple window coverings across a sunlit gallery or dialing in the exact drop height to protect delicate interior finishes, customized remote settings elevate daily living comfort.
Pairing Multiple Shades to One Pico Remote for Group Control
A single Pico remote can seamlessly manage multiple shades across one room. To establish group synchronization without erasing existing connections, walk through the direct handshake process with each window treatment individually:
- Wake the first shade drive into pairing mode via its indicator button until the LED turns solid green.
- Hold the remote’s bottom button for ten seconds to establish the link.
- Repeat this exact sequence for your second, third, or fourth window covering using the same remote.
Once linked, tapping Open or Close drives all connected motors simultaneously, creating immaculate hembar tracking across wide architectural window spans.
Setting the Favorite Position (Center Button Programming)
The circular preset button between the raise and lower rockers lets you recall a preferred intermediate height instantly. Use the directional buttons to move the shade to your ideal daylight balance. Press and hold the center round Favorite button for six uninterrupted seconds. The shade drive gives a subtle jog, confirming the exact position has been memorized. From that moment forward, a single tap effortlessly softens midday glare.
Adjusting Upper and Lower Window Travel Limits
Accurate travel limits prevent fabric from rubbing against crown moldings or bunching across window sills. To enter limit adjustment mode, press and hold both the Open and Raise buttons simultaneously for roughly seven seconds until the shade LED begins flashing continuously. Use the raise and lower buttons to gently reposition the hembar to its ideal stopping point. When the fabric rests precisely where desired, press and hold the Open button for six seconds to lock in the upper limit.
This level of precision proves essential when installing artisanal textiles. Tailoring motorized treatments like custom Lutron Roman shades requires millimeter-precise stopping limits to protect delicate woven fibers and preserve soft, waterfall folds from crushing against millwork. If you prefer white-glove expertise to calibrate your home’s window treatments, reach out to Luxe Drapery and Shades to schedule a tailored design and programming consultation.
Troubleshooting Lutron Remote Pairing Issues and Professional Solutions
An unresponsive motorized shade rarely points to an irrecoverable motor failure. In most situations, simple signal friction, battery fatigue, or a lingering connection to an unreachable bridge disrupts the wireless handshake. Before replacing hardware, running a systematic diagnosis will clarify why your controller isn’t responding and re-establish effortless control.
Diagnosing Common Pairing Failures
LED indicators provide immediate diagnostic feedback. A steady amber light signals that the internal motor battery requires recharging or replacement, while a flashing red light highlights a physical obstruction along the window jamb or a mechanical fault. Structural architecture can also interfere with wireless radio frequencies. Deep recessed metal ceiling pockets, aluminum valances, and low-E glass coatings can attenuate Clear Connect RF signals. If you are learning how to pair a new remote to Lutron shades that were previously assigned to an inactive smart bridge, the motor will ignore new handheld inputs until that legacy link is cleared.
How to Factory Reset a Pico Remote and Shade Drive
Restoring factory defaults wipes corrupted settings and allows for a clean pairing attempt:
- Reset the Remote: Triple-tap any button and hold the third tap for six seconds until the indicator LED blinks rapidly. Release the button, then immediately triple-tap again. The LED flashes slowly to confirm the remote is restored to factory settings.
- Reset the Shade Motor: Triple-tap the shade drive button, holding on the third tap until the LED pulses rapidly. Release and immediately triple-tap once more. The shade jogs up and down to confirm all prior remote associations have been cleared.
When to Engage a Certified Lutron Shading Specialist
While standard pairings are manageable at eye level, architectural residences present unique structural and technical demands. Multi-story window walls, double-height great rooms, and recessed clerestory glass require specialized access equipment and advanced motor diagnostics. Coordinating motorized shades, custom drapery tracks, and wall-mounted lighting keypads also benefits from sophisticated system-level programming.
When fine-tuning estate-scale automation throughout Los Angeles and the South Bay, partnering with a licensed professional protects your investment. Connect with Luxe Drapery and Shades to schedule certified Lutron programming and bespoke installations tailored to the refined standards of your living space.
Elevate Your Living Spaces with Effortless Shading Control
Achieving perfect daylight balance should feel intuitive, never complicated. By distinguishing between direct RF links and bridge-managed networks, you safeguard your custom travel limits while unlocking the convenience of single-touch group control. Mastering how to pair a new remote to Lutron shades restores effortless privacy, visual comfort, and quiet elegance to your everyday living spaces.
When architectural valances, soaring clerestory windows, or estate-wide automation call for specialized care, professional guidance makes all the difference. As a licensed and bonded California contractor (CSLB #1066068), Luxe Drapery and Shades provides boutique, full-service motorization solutions throughout Los Angeles and the South Bay. Whether you are installing bespoke motorized drapery, tailored Roman shades, or whole-home lighting controls, our technicians bring quiet confidence and meticulous craft to your home. Schedule a design consultation with Luxe Drapery and Shades to experience the transformative comfort of seamlessly curated shading today.
Frequently Asked Questions
Can one Lutron Pico remote control multiple shades simultaneously?
Yes, a single Pico remote can command multiple shades simultaneously across an entire room. By repeating the standard pairing sequence with additional shade drives, you link several treatments to the same remote channel. This setup allows motorized roller shades and drapery across wide architectural windows in Los Angeles homes to open, close, and track together with a single tap.
How do I know if my Lutron shade is in pairing mode?
A Lutron shade confirms pairing mode through both visual and physical signals. Once you press and hold the drive button for five seconds, the indicator LED illuminates solid green, and the fabric performs a slight physical jog up and down. This subtle movement lets you know the motor drive is actively scanning for an incoming radio-frequency handshake from your new controller.
Will pairing a new remote delete my existing shade limits or schedules?
No, pairing an additional remote will not overwrite your calibrated upper and lower travel limits or cloud schedules. The remote pairing sequence simply registers a new transmitter ID within the motor’s receiver memory. Established physical travel stops and automated daily scenes remain untouched unless you intentionally initiate the separate limit-reprogramming sequence or reset the hub configuration.
Why is my Lutron shade not responding to the new remote control?
An unresponsive shade usually points to a dead battery, an incomplete pairing handshake, or radio frequency obstruction. If your motorized window treatments sit inside recessed architectural metal pockets, the Clear Connect signal might suffer interference. When troubleshooting how to pair a new remote to Lutron shades, make sure the shade LED flashes rapidly during pairing and verify your Pico remote battery maintains full voltage.
How do I pair a Pico remote if I have a Lutron Smart Bridge or Caséta hub?
You must pair the remote directly through the Lutron app rather than the shade drive button. Open the app, navigate to Settings, choose Add Device, and select Pico Remote. When prompted, hold the remote’s bottom button for ten seconds. The smart hub automatically binds the remote to the bridge, enabling you to assign individual shades or complete room scenes digitally.
How do I factory reset a Lutron motorized shade before pairing a new remote?
To clear prior system associations, perform a triple-tap sequence directly on the shade button. Triple-tap the drive button quickly, holding the third tap down until the indicator LED pulses rapidly. Release the button, then immediately triple-tap once more. The shade will jog up and down, indicating all prior network links and remote pairings have been cleared from memory.
What type of battery does the Lutron Pico remote take and how long does it last?
Lutron Pico remotes operate on a single standard CR2032 3-volt lithium coin cell battery. Because Lutron’s Clear Connect protocol uses ultra-low power consumption, these batteries typically last up to ten years under normal daily residential use. If a remote becomes sluggish after years of service, unscrewing the back casing allows for a quick, tool-free coin cell replacement.